Most teams that take deliverability seriously have Google Postmaster Tools wired up. They watch the domain reputation graph, they track the spam rate against the 0.3% line, and they can tell you what Gmail thinks of them on any given day.
Ask the same teams what Outlook thinks of them and the room goes quiet.
That is a problem, because the Microsoft estate is not a rounding error. Outlook.com, Hotmail, Live, and MSN cover an enormous consumer footprint, and Microsoft 365 with Exchange Online Protection in front of it sits on a very large share of corporate mailboxes. If you sell B2B, there is a good chance Microsoft filters more of your pipeline than Google does. Running blind on that half of the internet while obsessing over the Gmail dashboard is a strange way to manage reputation.
Microsoft does publish a free telemetry tool. It is called Smart Network Data Services, almost always shortened to SNDS, and it is older, blunter, and considerably less friendly than the Google equivalent. It is also the only first-party window you get into how Microsoft scores your sending IPs.
This guide covers what SNDS actually reports, how to get access, how to read the data without drawing the wrong conclusion, and the specific list quality problem it surfaces that most senders cannot resolve with a standard verification tool.
What SNDS Reports, and What It Does Not
Set expectations first, because the single biggest source of frustration with SNDS is people expecting a Postmaster Tools clone.
SNDS is IP based, not domain based. Google reports on your sending domain’s reputation. Microsoft reports on the reputation of the IP addresses your mail arrives from. That one design difference drives almost everything else about how you use the tool, including whether you can use it at all.
For each IP you have access to, SNDS gives you a daily or part-day breakdown that typically includes:
- Activity period, the window the row covers
- RCPT commands, how many recipients you attempted to deliver to
- Data commands, how many of those attempts proceeded to actually transmitting a message
- Message recipients, the count Microsoft accepted
- Filter result, the headline reputation verdict for that IP
- Complaint rate, bucketed into bands rather than given as a precise figure
- Trap message period, whether you hit a Microsoft spam trap and roughly when
- Sample HELO, the HELO or EHLO string your sending host presented
What SNDS does not give you is equally important. There is no domain reputation score. There is no authentication pass rate breakdown for SPF, DKIM, and DMARC. There is no inbox versus spam folder placement rate. There is no per-campaign view. If you want authentication reporting you need DMARC aggregate reports, and if you want placement data you need seed testing, which is a separate exercise from reputation telemetry.
Treat SNDS as a smoke alarm rather than a diagnostic suite. It tells you that Microsoft has a problem with a given IP and gives you two or three clues about why. The actual root cause analysis happens in your own data.
The Access Prerequisite Most Senders Hit First
Here is the catch that stops a lot of people on day one. Because SNDS is organised around IP addresses, Microsoft will only show you data for IPs you can demonstrate you are responsible for.
Request access and you will be asked to verify control of the IP range. Verification works through the technical or abuse contact already published for that range, usually resolved from WHOIS or the relevant regional internet registry record. Microsoft sends the authorisation to that contact, not to you.
So the practical question becomes: who owns the IPs your mail leaves from?
If you send on your own dedicated IPs, whether on your own infrastructure or a dedicated IP from your ESP, you are in good shape. Either the WHOIS contact is you, or it is your provider and they can forward or approve the request. Ask your ESP support team directly. Most of the large providers have done this hundreds of times and have a documented process.
If you send on your ESP’s shared IP pool, you will probably never get SNDS access for those IPs, and you should stop trying. The IPs belong to the provider, the data covers every customer sharing that pool, and no provider is going to hand you a feed that mixes in other tenants’ sending behaviour. This is not an obstacle to route around. It is a structural fact of shared sending, and the honest answer is that on shared IPs your IP reputation is largely out of your hands. Your leverage sits in domain reputation and list quality instead, which we come back to at the end.
If you run cold outreach from your own dedicated infrastructure, which is the usual setup once volume gets serious, SNDS is genuinely valuable and worth the paperwork. If you are still deciding how to structure that, our guide to a separate domain for cold email covers the sending architecture side of the same problem.
Getting Set Up, Step by Step
Step 1: Confirm which IPs you actually send from. Do not guess from your ESP dashboard. Send a message to a mailbox you control, open the raw headers, and read the connecting IP out of the topmost Received header that your own infrastructure did not add. If you send through multiple paths (marketing platform, transactional provider, CRM sequencer, your own MTA) each one is a separate IP or range and needs handling separately.
Step 2: Request access. Go to the SNDS site at sendersupport.olc.protection.outlook.com/snds/ and sign in with a Microsoft account. Use a shared or role account that more than one person on your team can reach, not a personal login belonging to whoever happens to be handling deliverability this quarter. Submit the IP or CIDR range you need.
Step 3: Clear the verification. Microsoft routes the authorisation request to the contact on the IP registration. Watch for it, or chase your provider if the range is theirs. This is the step that stalls, and it stalls silently, so put a reminder on it rather than assuming no news means it is processing.
Step 4: Enrol in JMRP at the same time. The Junk Email Reporting Program is Microsoft’s complaint feedback loop, and it is a separate signup from SNDS. SNDS tells you your complaint rate sits in an uncomfortable band. JMRP tells you which specific addresses hit the junk button so you can actually suppress them. Running SNDS without JMRP means you see the symptom and never the record. Enrol in both or the exercise is half done. If feedback loops are new to you, we have a full walkthrough of how FBLs work and how to set them up.
Step 5: Automate the pull. The web interface is fine for a spot check and painful as a habit. SNDS offers automated data access: you generate a key, and appending it to the documented data URL returns the same dataset in a machine readable form you can pull on a schedule. Drop it into whatever you already use for reporting and set an alert on the filter result changing. Nobody reliably logs into a Microsoft portal every Monday for six months, but a notification that fires when an IP flips out of green will get read.
Reading the Filter Result Without Panicking
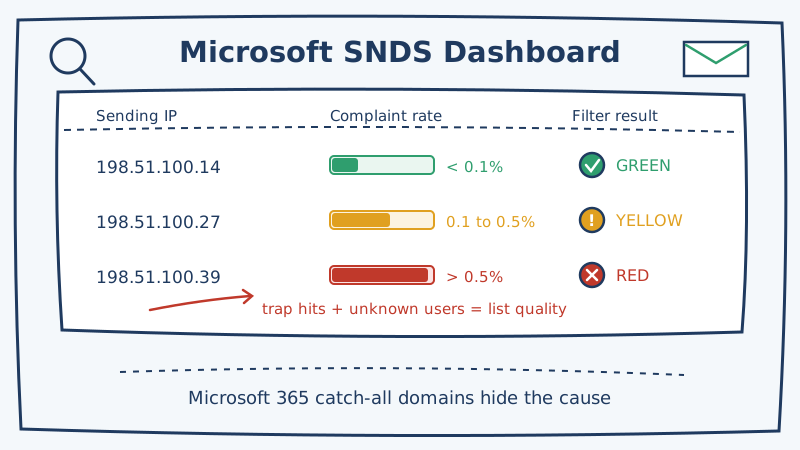
The filter result is the number everyone looks at. SNDS reports it as a colour band rather than a score.
Green means Microsoft currently has no meaningful complaint signal against that IP. Mail is being handled normally. Green is the steady state you want, and a green IP can still land in the junk folder, because reputation and placement are related but not the same thing.
Yellow means complaints are elevated enough to be visible. This is your warning shot. Yellow usually appears before any delivery impact you would notice in a dashboard, which makes it the most actionable state in the whole tool. Investigate a yellow IP the week you see it, not the month after.
Red means complaints are high enough that Microsoft considers the IP a problem, and filtering decisions will reflect that.
The complaint bands behind those colours are narrow. The green band sits under roughly a tenth of a percent, yellow covers the span from there to around half a percent, and red is anything above that. Those are small numbers in absolute terms, and worth sitting with for a second: on a hundred thousand sends, a few hundred junk button presses is enough to move you out of green. Complaint rate is not a forgiving metric at Microsoft any more than it is at Gmail or Yahoo, and if you want the broader context on that, our post on reducing spam complaint rate against Gmail and Yahoo thresholds sets out the equivalent limits elsewhere.
Two more fields deserve attention even when the filter result looks healthy.
The RCPT to data command gap. Compare the recipients you attempted against the messages that actually got transmitted and accepted. A wide and persistent gap means Microsoft is rejecting or deferring a meaningful share of your attempts before you ever send a body. That is often unknown user rejections, which is a list quality signal, and it shows up here before it shows up anywhere in your ESP’s bounce reporting.
Trap message period. If this field is populated, you hit a Microsoft spam trap. A trap hit is not a complaint and it is not a bounce. It is an address that exists only to catch senders mailing lists they did not build cleanly, and it is strong evidence that something in your acquisition is wrong: a purchased list, a scraped segment, an old import nobody has audited, or a recycled domain that used to belong to a real person. One trap hit is a question. A pattern of trap hits is an answer. Our breakdown of what spam traps are and how to avoid them goes deeper on the varieties and where they come from.
When Microsoft Starts Blocking Outright
If reputation degrades far enough, you stop getting filtered and start getting refused at the door. Microsoft’s rejections are unusually readable compared with most providers, which is a small mercy.
You will see 550 5.7.1 responses stating that messages from your IP were not sent, carrying a Microsoft specific identifier such as an S3150 or S3140 style code, often with a link to their sender guidance. A 5.7.511 style response indicates the sender is banned rather than merely filtered. Throttling and deferrals arrive as 4.x.x codes, which are temporary and tell you Microsoft is slowing you down rather than rejecting you, and those are a signal to reduce send rate rather than to retry harder.
The important interpretive point: a block is a lagging indicator. By the time you are reading 550 5.7.1 in your bounce logs, the SNDS filter result has very likely been yellow or red for a while and nobody was watching. That is the entire argument for setting SNDS up before you need it. If you are already in the hole, our sender reputation recovery plan covers the climb back out, and it is slower than the slide in. If you also need to confirm you have not picked up a listing along the way, Scrubby’s product suite includes a blacklist monitor that watches your domains and IPs against over 100 blacklists, so a new listing surfaces as an alert rather than as a mystery drop in reply rate.
The Blind Spot SNDS Exposes and Cannot Fix
Here is where SNDS stops being a monitoring story and becomes a list quality story.
Suppose your filter result slips to yellow and your RCPT to data gap is widening. You have a strong hypothesis: you are mailing a meaningful number of addresses that do not exist. The obvious fix is to validate the list and remove them.
So you run it through an SMTP verification tool. And a large slice of your Microsoft-hosted B2B addresses comes back as neither valid nor invalid, but as Accept-All, Catch-All, or Risky.
That result is not the tool failing. It is the tool honestly reporting that it cannot know. Exchange Online and Microsoft 365 tenants very commonly accept mail for any address at the domain during the SMTP conversation, then decide what to do with it afterwards, generating a non-delivery report later if the mailbox turns out not to exist. An SMTP probe only observes the conversation. If the server says yes to everything, every address at that domain looks identical from the outside, whether it belongs to a current employee or to someone who left in 2019.
The consequence is circular and genuinely frustrating. SNDS tells you bad addresses are hurting your Microsoft reputation. Your verification tool cannot tell you which of your Microsoft-hosted addresses are bad. The segment causing the problem is precisely the segment standard verification refuses to rule on.
This is the gap Scrubby was built for. Scrubby validates catch-all and risky emails that standard SMTP verification tools cannot resolve, using deep inbox-level testing over a 48 to 72 hour window to return a definitive valid or invalid verdict rather than leaving the address in limbo. The workflow sits downstream of whatever verifier you already run, not in place of it:
- Run the full list through your existing SMTP verification tool, whether that is ZeroBounce, NeverBounce, MillionVerifier, or another.
- Act on the clean verdicts immediately. Remove the hard invalids.
- Export the Risky, Catch-All, and Accept-All segment, the one your verifier would not call.
- Upload that segment to Scrubby’s deep verification, which works through the 72 hour window to resolve it.
- Suppress the confirmed invalids and mail the confirmed valids with reasonable confidence.
Two things come out of that. The obvious one is that you stop mailing dead Microsoft mailboxes, which is what was damaging the reputation SNDS was complaining about. The less obvious one is that you recover addresses you were about to throw away. A catch-all domain full of real, working, reachable prospects looks exactly like a catch-all domain full of dead ones until something actually checks, and the conservative response (delete the whole ambiguous segment) quietly discards good pipeline. Scrubby reports recovering up to 42% more usable leads from lists handled this way, at 98% deliverability on what it clears.
If the problem sits in your CRM rather than in a campaign export, CRM cleaning handles the same resolution against contact records directly, and there are integrations for Clay, HubSpot, Salesforce, Pipedrive, Instantly, and SmartLead so the step does not have to be a manual CSV round trip. For the underlying mechanics of why these addresses behave the way they do, the ultimate guide to catch-all emails is the longer read.
A Monitoring Cadence That Survives Contact With a Real Week
Elaborate monitoring routines get abandoned by week three. Keep it small enough to actually happen.
Weekly, five minutes. Check the filter result for every IP you have access to. Anything that is not green gets looked at this week. Check whether trap message period is populated anywhere. Glance at the RCPT to data gap and note whether it is widening.
Monthly, half an hour. Pull the JMRP complaints and confirm those addresses are genuinely suppressed across every system you send from, not just the one that sent the offending message. Compare your Microsoft figures against Google Postmaster Tools for the same period: if Google looks fine and Microsoft does not, the problem is probably concentrated in your B2B segment, which is exactly where catch-all addresses cluster. Check whether your bounce rate is drifting against the benchmarks for your industry.
Quarterly, a real session. Re-validate the whole active list, push the ambiguous segment through deep verification, and audit where your addresses are coming from. If trap hits showed up at any point in the quarter, that audit is not optional, because a trap got onto your list through a door that is probably still open.
If You Cannot Get SNDS Access
Plenty of senders on shared ESP infrastructure will read all of this and conclude, correctly, that SNDS is not available to them. The underlying job does not go away, it just moves.
Watch your Microsoft bounce and deferral codes directly, since your ESP’s bounce logs carry the same 550 5.7.1 and 4.x.x responses SNDS would have warned you about, only later. Segment your deliverability reporting by recipient domain so Microsoft-hosted recipients are visible as their own line rather than averaged into a single number that hides the problem. Get your authentication complete and aligned, because on shared IPs your domain is the strongest identity signal you own. And lean harder on list quality than a dedicated-IP sender needs to, because it is the main lever genuinely left in your hands.
That last point is the one worth keeping. SNDS is a better instrument than most senders realise and a worse one than they hope for. It will tell you that Microsoft has stopped trusting an IP, and it will point at complaints and traps as the reason. What it will never do is tell you which addresses to remove. That part is list hygiene, and on the Microsoft estate specifically, list hygiene means resolving the catch-all segment rather than averting your eyes from it.
You can start that without a procurement conversation: Scrubby offers 200 free validation credits with no credit card, which is enough to take your most suspicious catch-all segment and find out whether the problem is as large as SNDS has been implying.

Kristel K.
Content Strategist